De vez en cuando, es posible que un cliente de diseño web te pregunte específicamente por los mapas responsivos de Google. Ahora bien, si ya estás familiarizado con la plataforma de Duda, sabrás que su constructor de sitios web de nivel profesional viene con un fantástico widget de mapas responsivos impulsado por Mapbox.
Nos encanta Mapbox porque permite una fácil integración en aplicaciones móviles y en línea, y es muy adaptable a nuevos diseños y disposiciones de mapas. Por no mencionar que tiene una gran cobertura global.
Dicho esto, si se requiere un mapa de Google para un proyecto, continúas teniendo cobertura. La plataforma flexible de Duda te permite añadir fácilmente casi cualquier tipo de mapa que tú y tus clientes quieran utilizar.
Aquí hay cinco maneras de añadir un mapa responsivo de Google a cualquier sitio web...
UN POCO SOBRE GOOGLE MAPS
Más de 150 millones de usuarios acceden a Google Maps mensualmente. Añadir un widget responsivo de Google Maps puede ayudar a los consumidores a localizar los negocios de sus clientes, da credibilidad a sus organizaciones y mejora la experiencia general del usuario.
La incorporación de un mapa en tu sitio web también puede reducir la tasa de rebote y ayuda a tus esfuerzos de optimización de motores de búsqueda.
Los mapas de Google son interactivos de por sí, y Google facilita su integración en los sitios web. Sin embargo, Google Maps no es responsivo por defecto, lo que significa que no cambia de tamaño automáticamente en función del tamaño de la pantalla del dispositivo. Se necesita una programación adicional para hacer posible el cambio de tamaño automático.
¿Hay que pagar por Google Maps para ponerlo en un sitio web?
Sí y no. El acoplamiento básico es gratuito e incluye una vista sencilla, un pin del mapa y la información de tu empresa.
Sin embargo, para las funciones más complejas, se cobra una tasa, por ejemplo, para mostrar varias ubicaciones o implementar funciones más avanzadas como Google Street View, encontrar rutas y buscar lugares, Google empieza a cobrar una vez que se alcanzan las cuotas de uso.
¿CÓMO PUEDO ACOPLAR GOOGLE MAPS EN MI SITIO WEB?
La incrustación de Google Maps en cualquier sitio web se puede hacer de varias maneras.
Un novato puede manejar la mayor parte del código, aunque es útil cierto conocimiento de HTML, CSS y JavaScript. Google proporciona el código y hay varias formas de incrustar Google Maps responsivo en cualquier sitio web usando Iframes.
En esta publicación, abordaremos varios métodos de bricolaje describiendo procedimientos paso a paso sobre cómo incrustar mapas responsivos en cualquier plataforma de sitio web, incluidos Duda y otros.
INTEGRACIÓN DE GOOGLE MAPS USANDO UN SIMPLE CÓDIGO IFRAME ACOPLADO DE GOOGLE
Esta sección cubrirá la copia del código de inserción de Google de los mapas de Google en el código HTML de un sitio. No se aplica ningún otro código de formato.
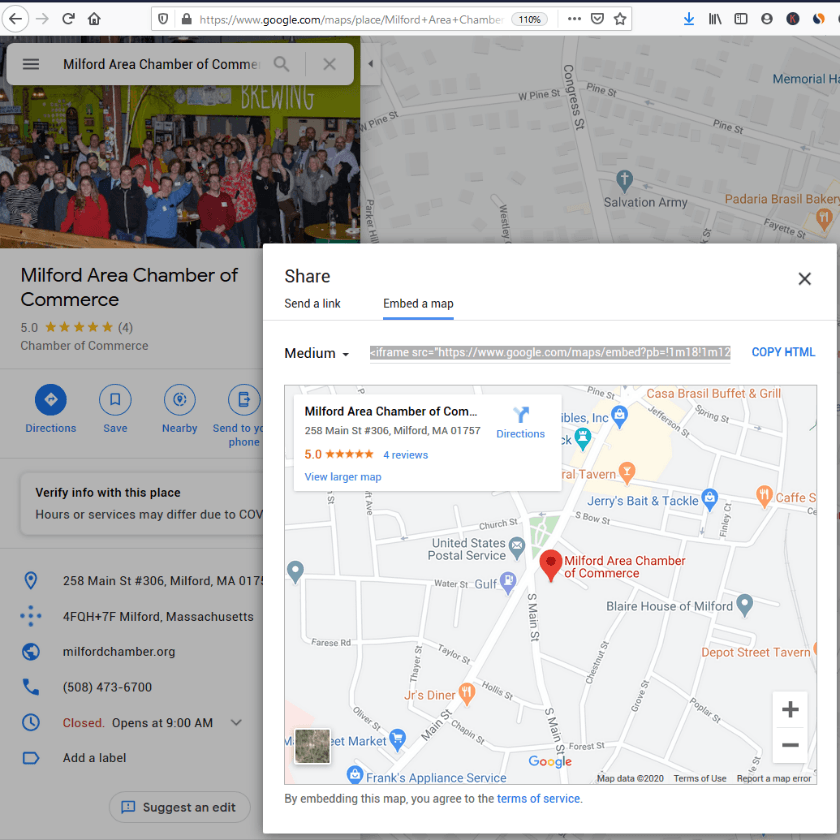
Obtener un código de acoplamiento de Google
- Ir a
Google Maps
- Coloca la dirección de la empresa en la barra de búsqueda y haz clic en el botón de búsqueda
- Haz clic en el icono Compartir
- Selecciona "Acoplar mapa".
- Selecciona el tamaño del mapa en el menú desplegable
- Selecciona y copia el código HTML iframe de inserción
Pega el código de inserción en tu página HTML o widget
El código debería verse así. El "xxxxxxxxx" representa el código de ubicación de Google.
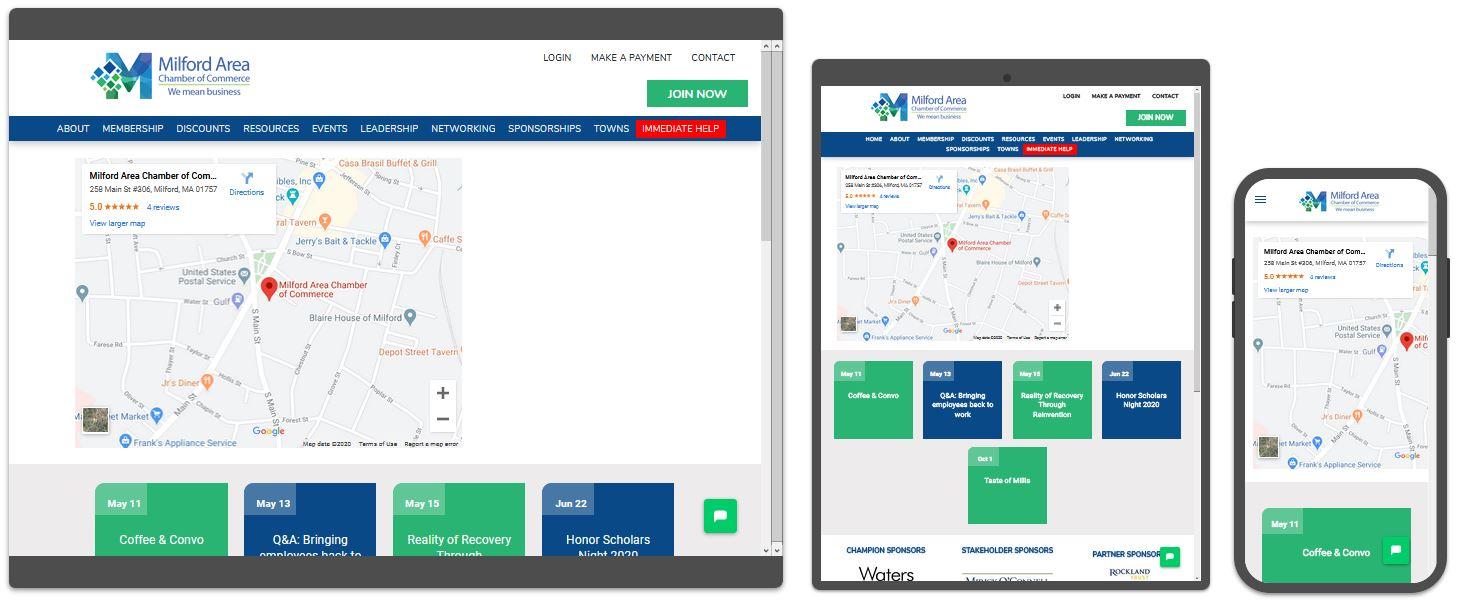
Este mapa resultante tiene un ancho y alto estáticos de 600 y 450 píxeles respectivamente.
El tamaño se puede ajustar cambiando estos atributos de tamaño, pero este mapa no es un mapa de Google receptivo que cambiará de tamaño automáticamente en varios dispositivos. Para hacer un mapa receptivo, necesitamos profundizar un poco más.
CREAR MAPAS RESPONSIVOS DE GOOGLE SIN CLAVE API
Es posible acoplar un mapa responsivo de Google en un sitio web sin utilizar la API de Google Map. A continuación se explica cómo hacerlo.
Obtener un código de acoplamiento de Google
- Ir a
Google Maps
- Coloca la dirección de la empresa en la barra de búsqueda y haz clic en el botón de búsqueda
- Haz clic en el icono Compartir
- Selecciona "Incrustar mapa".
- Selecciona el tamaño del mapa en el menú desplegable
- Selecciona y copia el código HTML iframe de inserción
Pega el código de acoplamiento en tu página HTML o widget
Modificar el código de acoplamiento
Añade una clase de llamada CSS map-responsive alrededor del iframe como sigue:
Editar el CSS del sitio
Añade el código CSS de Google Maps de la siguiente manera:
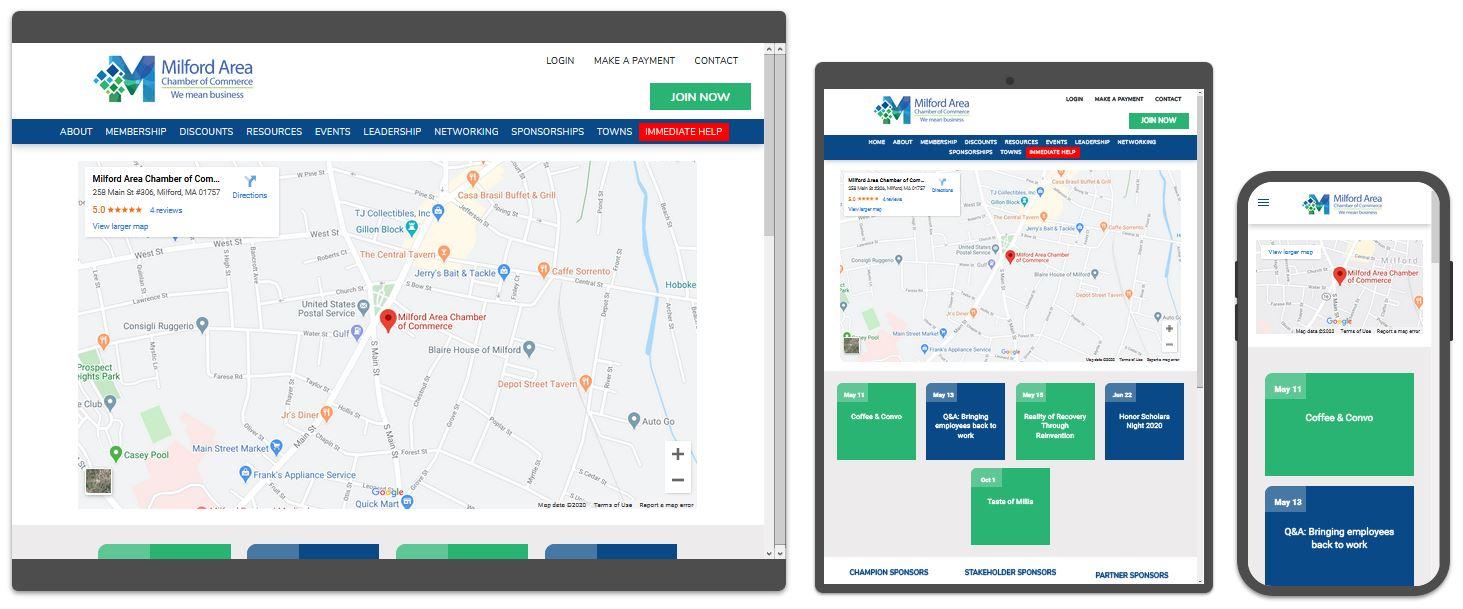
Puedes cambiar la altura del mapa ajustando el valor de padding-bottom así: padding-bottom:40%;
Ahora tienes un mapa responsivo de Google sin usar una clave API. Este método de acoplamiento y estilo CSS debería funcionar para cualquier sitio web basado en HTML.
Aprende a utilizar las consultas de medios para dispositivos estándar aquí.
CÓMO ACOPLAR UN MAPA DE GOOGLE RESPONSIVO SIN APIS DE GOOGLE O MÁS ESTILOS CSS
Aunque este tipo de integración de mapas responsivos de Google es necesario para que funcione en plataformas más antiguas como WordPress y otros constructores de sitios web, el widget HTML de Duda hace que la implementación de mapas responsivos de Google sea muy sencilla y rápida si quieres acoplar uno en un sitio web de Duda. Solo hay que hacer un par de cosas.
Obtener un código de acoplamiento de Google
- Ir a
Google Maps
- Coloca la dirección de la empresa en la barra de búsqueda y haz clic en el botón de búsqueda
- Haz clic en el icono de compartir
- Selecciona "Acoplar mapa".
- Selecciona el tamaño del mapa en el menú desplegable
- Selecciona y copia el código HTML iframe de inserción
Pegue el código de inserción en su página HTML o widget
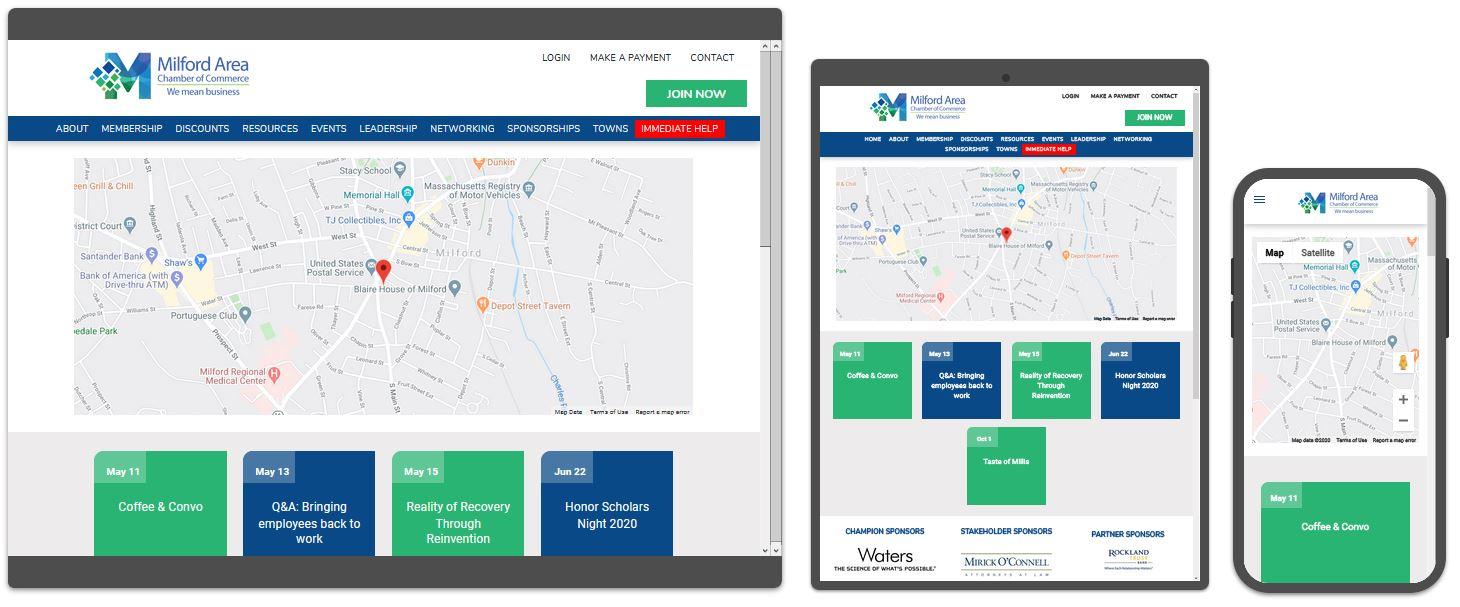
Cambiar el ancho y el alto del iframe al 100 por ciento permitirá que el mapa de Google abarque completamente el contenedor de widgets HTML, lo que hará que Google Map responda y sea fácil de cambiar de tamaño en cualquier dispositivo.
No se necesita más estilo CSS o uso de consultas de medios cuando se usa este método de inserción.
ACOPLAR UN MAPA DE GOOGLE MEDIANTE JAVASCRIPT A TRAVÉS DE GOOGLE MAPS APIS
Google Maps puede integrarse en un sitio web a través de las API. Además de HTML y CSS, es necesario tener conocimientos de JavaScript.
Aunque nuestro ejemplo es bastante sencillo, la plataforma de Google Maps ofrece funciones complejas, como el dibujo de marcadores de mapa, el cálculo de distancias y áreas, la visualización de puntos de interés destacados, los mapas térmicos, etc.
Puedes encontrar más detalles en las bibliotecas de
Google Maps.
Crear una clave API
- Dirígete a la consola de
Google Cloud Platform Console
- Selecciona o crea el proyecto para el que quieras añadir una clave de API
- Selecciona
API y servicios > Credenciales
- Haz clic en
Crear credenciales > Clave de API
Es importante
restringir la clave de API
restringir la clave de API antes de utilizarla en producción. Las restricciones proporcionan mayor seguridad y ayudan a garantizar que solo se realicen solicitudes autorizadas con tu clave de API.
Añada los scripts y el código de la API
Agregue el código de estilo del mapa a su página:
Añade el script del mapa que propaga el elemento del mapa, y edita las coordenadas:
Añade el script de la API de Google Maps:
Ahora tiene un mapa receptivo creado con la API de JavaScript de Google Maps.
ACOPLAMIENTO DE MAPAS DE GOOGLE USANDO WIDGETS Y PLUGINS DE TERCEROS
Es posible que no te apetezca complicarte con el código y quieras un widget ya hecho. Pues bien, ¡buenas noticias!
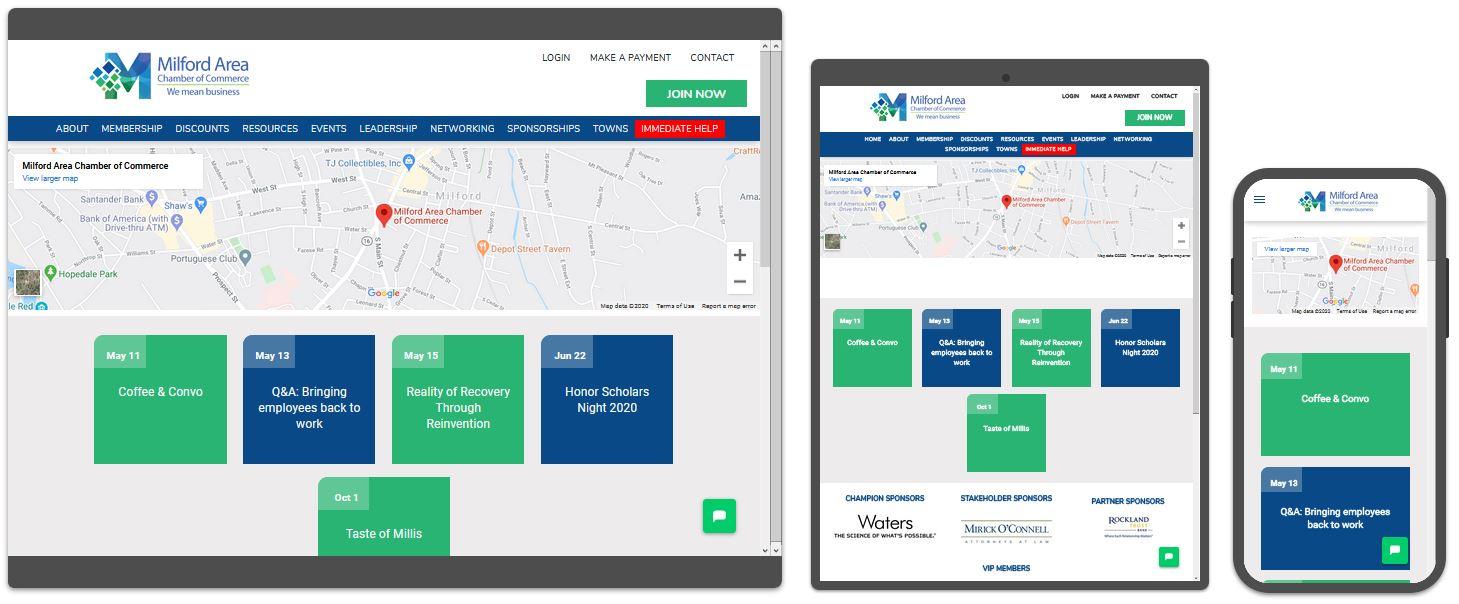
TheCamel.co, aliado de Duda desde hace mucho tiempo, ha creado un widget de
Google Map específicamente para el uso en la plataforma Duda.
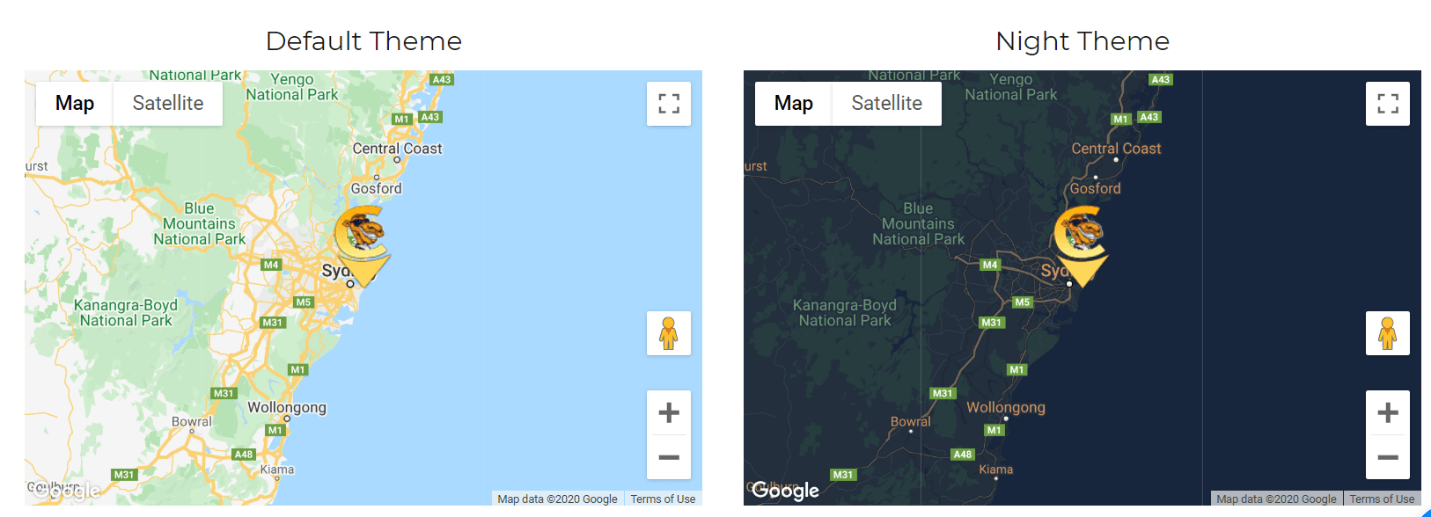
Este widget funciona muy bien para los negocios locales que tienen varias ubicaciones y tiene características avanzadas como la personalización del tema y de los pines, la visualización del logotipo, de la información del negocio y la posibilidad de zoom para la vista de la calle y del mapa.
Cuando se trata de la integración de Google Maps, hay múltiples maneras de hacer el trabajo. Van desde métodos de DIY para una simple integración de mapas y widgets personalizados hasta la implementación avanzada de la API de Google Maps en JavaScript.
Google Maps
ofrece APIs, SDKs y muchos tutoriales paso a paso y ejemplos de código para ayudar a los usuarios a crear sencillos Google Maps responsivos o mapas altamente personalizados que puedan hacer todo tipo de cosas interesantes.
Con solo unos pocos pasos, puedes aumentar tu sitio con una serie de funcionalidades, desde una simple vista de mapa hasta herramientas cartográficas altamente complejas e interactivas.