Under the Hood: A Closer Look at the Technology that Powers Flex

December 14, 2021
0 minute read

On July 12th, we released (in beta) Duda Flex, a brand new editor experience for our web pros. This article will cover Duda Flex, how it differs from the previous editor experience and one of the underlying technologies that power Duda Flex.


Are you ready to dive deep? Let's go!

What is Duda Flex?

Duda Flex is our newest editor experience for web pros to design pixel-perfect websites faster than ever. At its core, Duda Flex empowers web pros to take full advantage of the latest CSS developments, making it significantly easier to express position and layout.

Let's take a quick tour of the new editor experience:

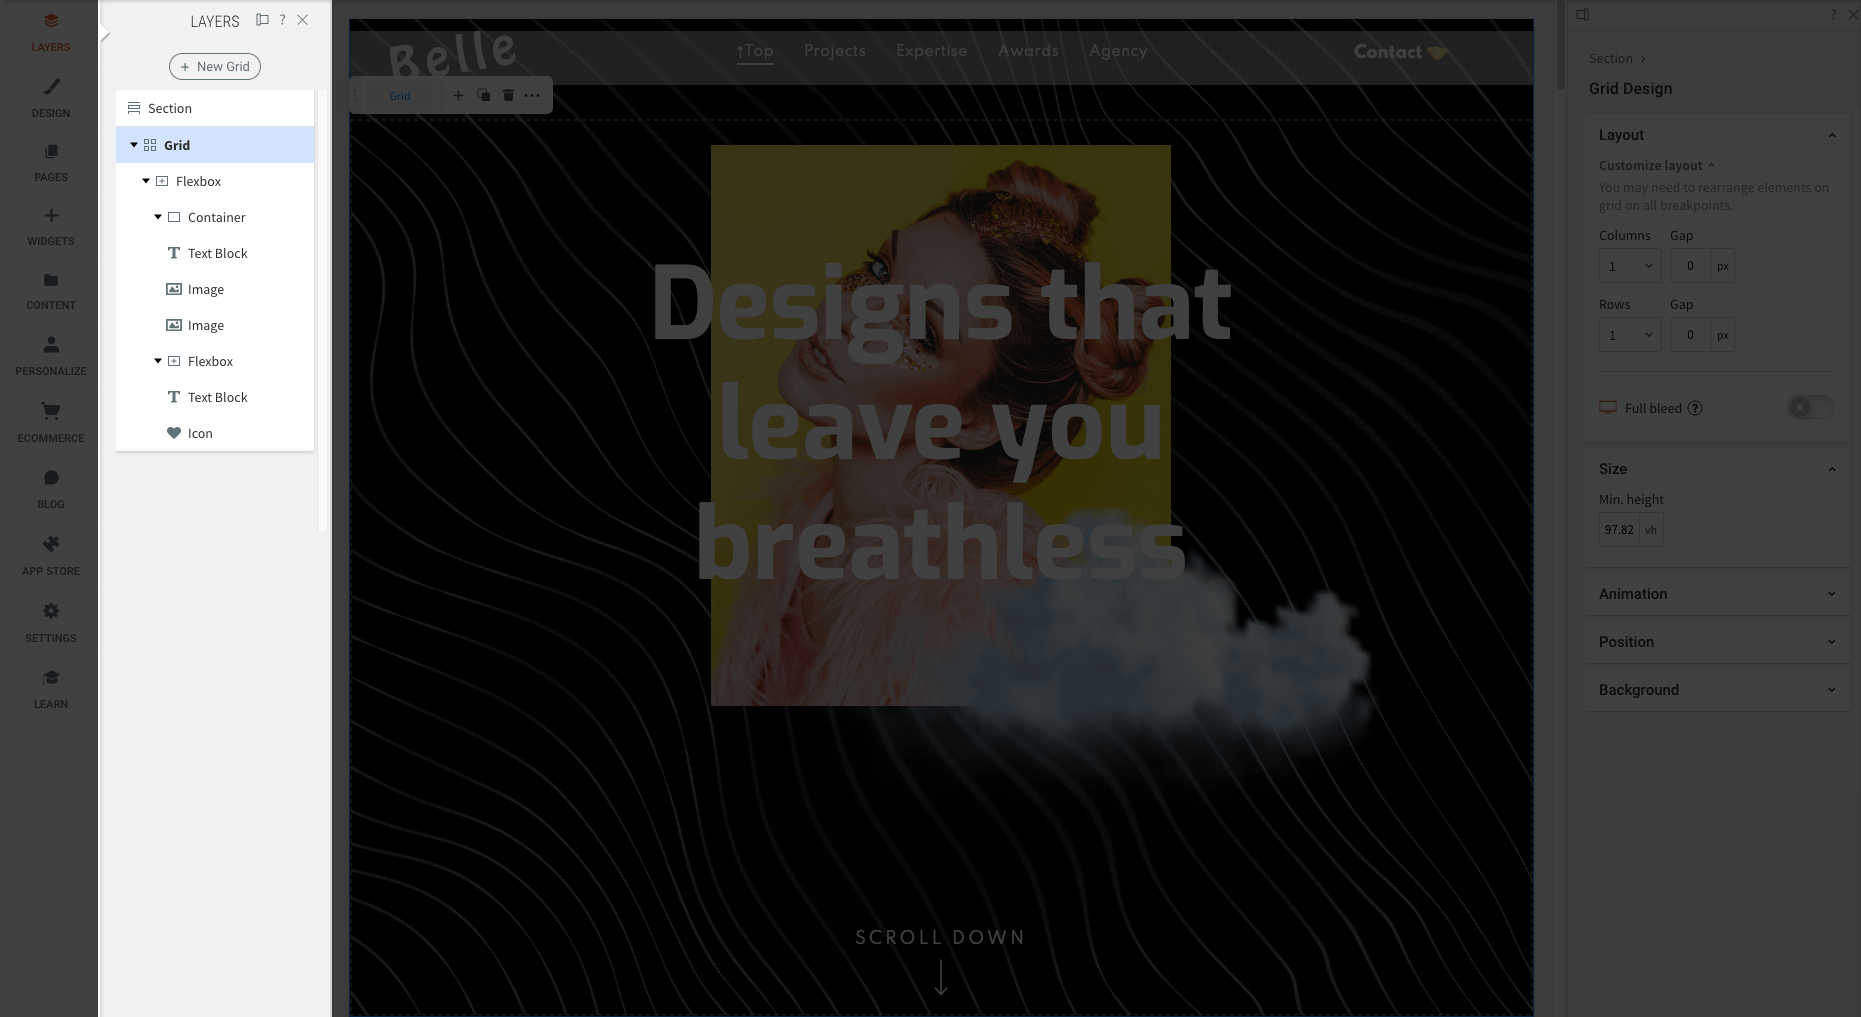
Layers

The Layers panel provides a convenient hierarchy of all the grids and child elements within the current Flex section. Each item listed in the Layers panel has inline options: "hide" and/or "add widget". Grids, Flexboxes, and Containers have the "hide" and "add widget" options, while all other elements only have the "hide" option.

Fun fact 💡: Duda will structure the underlying HTML markup based on the hierarchy defined in the Layers panel.

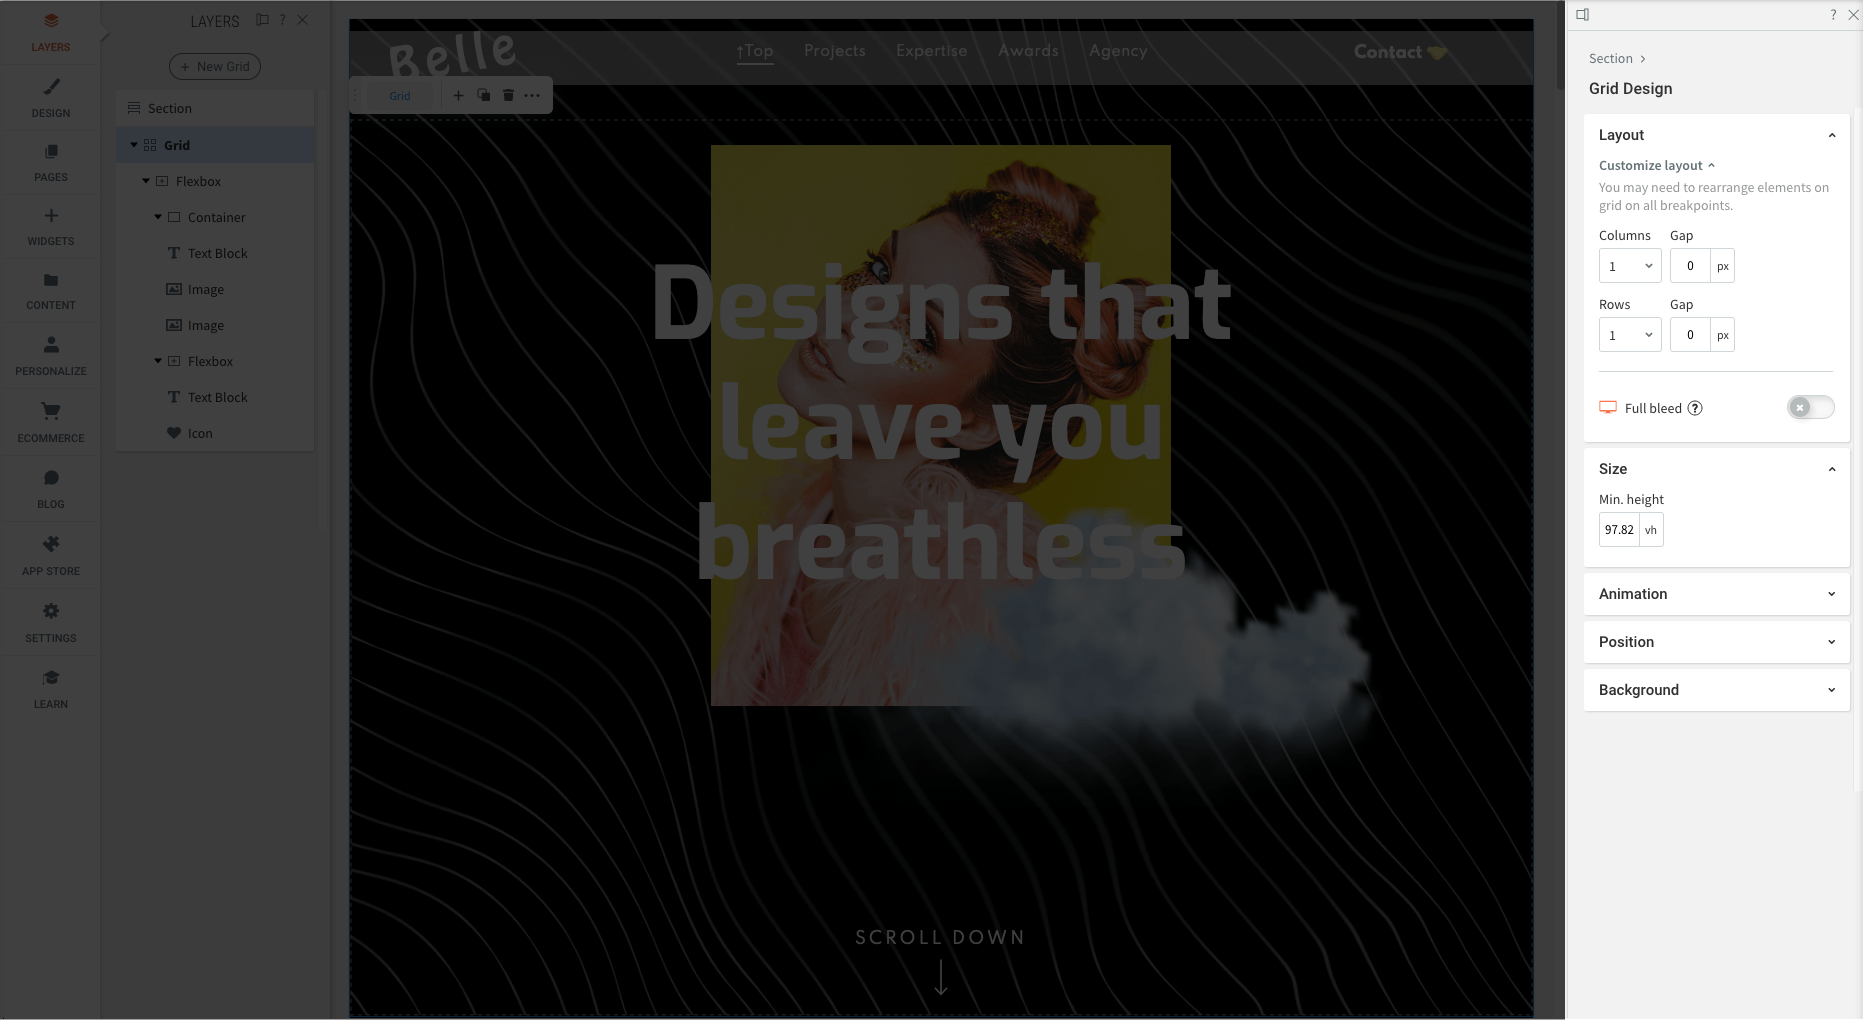
Grid Design

The Grid Design panel contains all of the settings for the selected Grid container. Here, we can update the number of rows and columns, the gap size, and the height of a Grid.

If you're familiar with CSS Grid, we're exposing grid-template-columns , grid-template-rows , and gap in the editor. If you're not familiar with CSS Grid, don't worry, we'll go over those properties shortly.

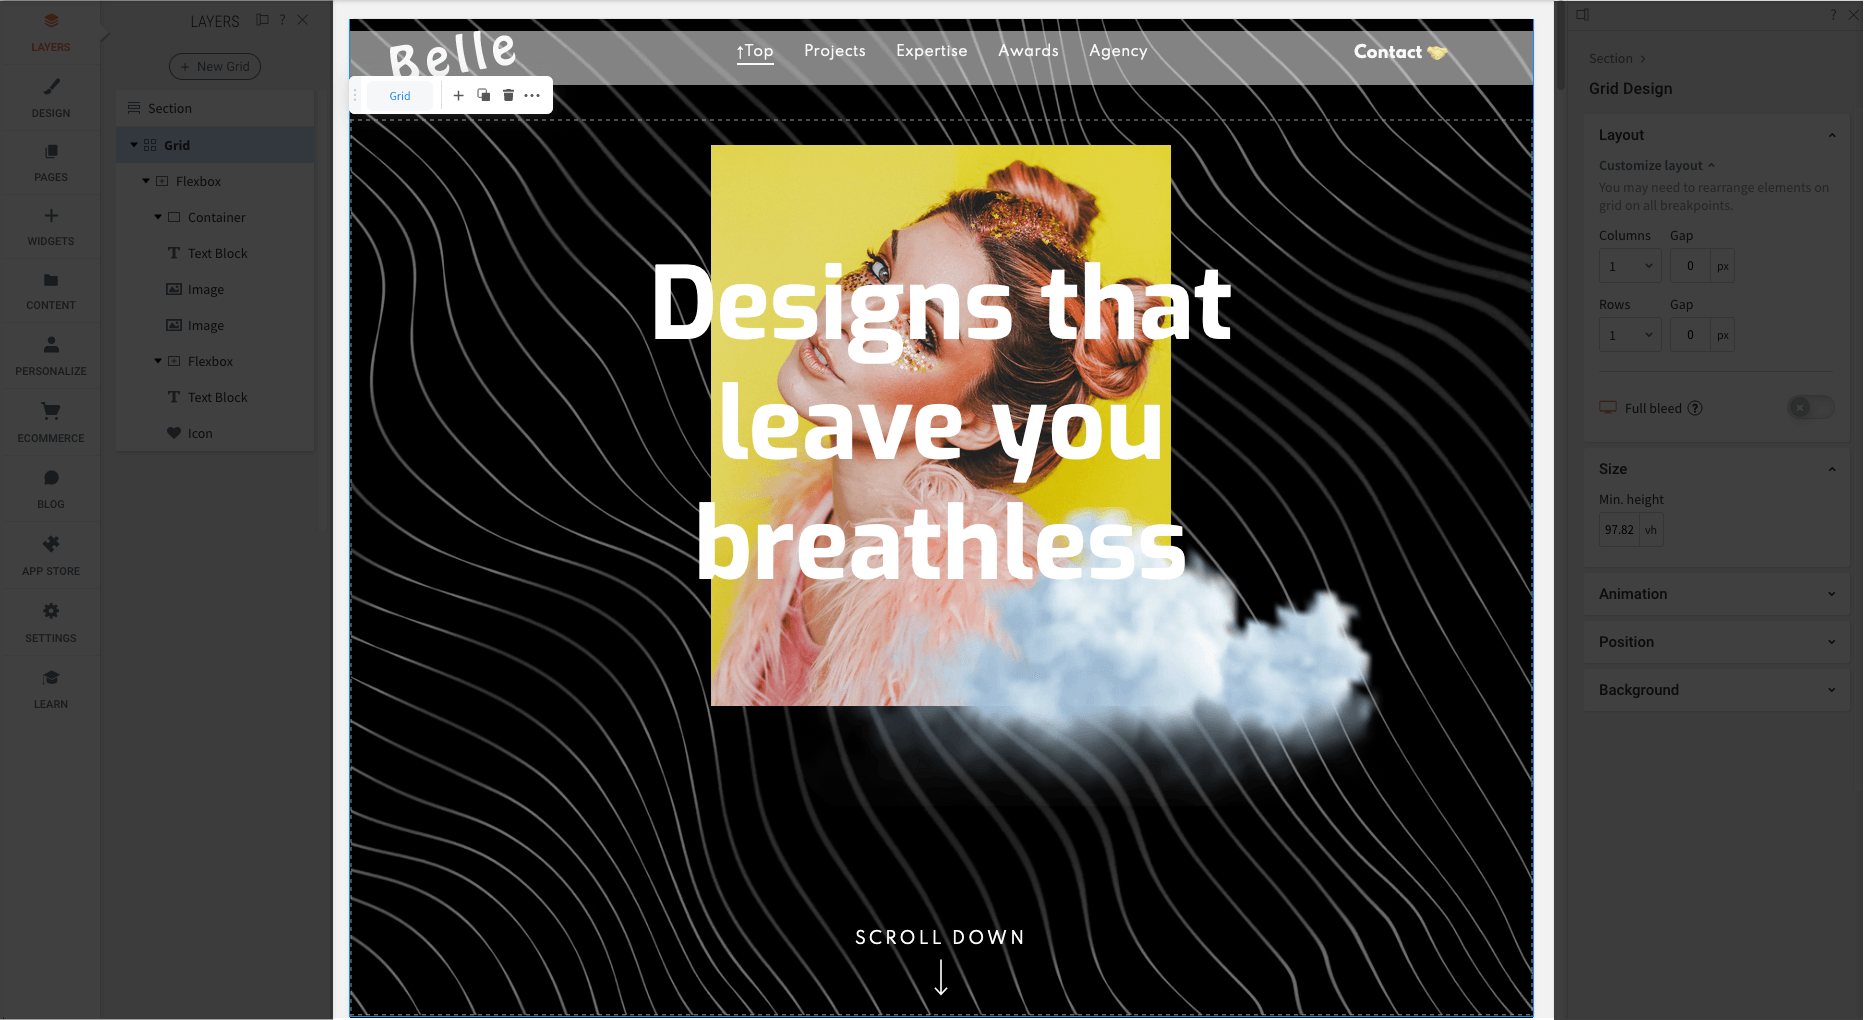
Flex Editor

The Flex Editor resembles many popular design tools, such as Figma, with various capabilities such as pixel-by-pixel placement, helpful spacing recommendations and "rulers", and much more.


Some more technical readers may ask themselves: "what's going on under the hood to enable this new editor experience?". Well, you're in luck; the rest of the article will go over a core technology that enables the Duda Flex experience — CSS Grid.

CSS Grid

One of the foundational technologies at the center of Duda Flex is CSS Grid. CSS Grid extends Flexbox concepts and enables developers to express their layouts in two dimensions (rows and columns) instead of the single dimension Flexbox provides (rows or columns). Thus, allowing developers to specify the exact position of an element based on its parent grid container.

Let's take a look at an example where we want to structure several header elements in the following fashion:

header-1 header-2 header-3
header-4 header-4 header-5

First, we'll set up our HTML document with a container div and five h1 elements with classes based on where we want them to appear in the grid.

See the Pen Duda Flex: CSS Grid by Everett Morgan ( @everett-duda ) on CodePen.

Next, we'll use the below CSS to express the structure of the grid system and its child elements. Although you may not be familiar with some of the new properties introduced with CSS Grid, don't worry, we'll cover them in a moment.

See the Pen Duda Flex: CSS Grid (CSS) by Everett Morgan ( @everett-duda ) on CodePen.

Now, let's check how that looks in the browser:

See the Pen Duda Flex: CSS Grid (CSS) by Everett Morgan ( @everett-duda ) on CodePen.

As we can see, our elements are exactly how we envisioned them. It's that easy with CSS Grid in our toolbox!

Key Concepts

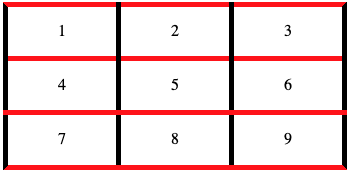
Next, let's go over some terms to help you get familiar with the grid system. A grid system is comprised of different concepts: lines, tracks, cells, areas, and gutters.

Lines

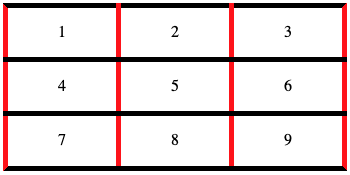
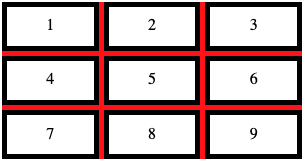
There are two types of lines: column lines and row lines. Think of them as the lines between each column and row in a table.

Tracks

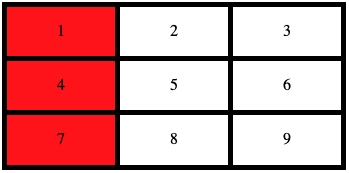
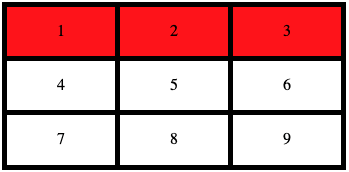
A track is the space between two adjacent grid lines. So, for example, if we have a 3x3 grid, we can extract the leftmost column track (1, 4, 7) or the topmost row track (1, 2, 3).

Cells

A cell is the smallest area within a single column and row. Think of the cells within an Excel table; they're the same.

Areas

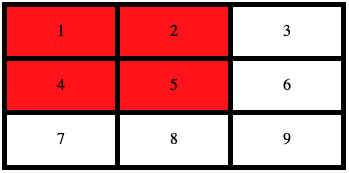
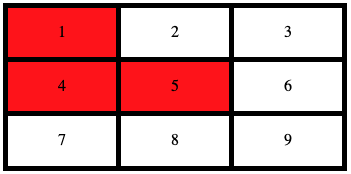
An area is a four-sided collection of two or more cells within a grid system. So, for example, we can lay out an element across four cells: 1, 2, 4, 5.

Note 💡: the image on the right depicts an invalid area.

Gutters

A gutter is the space between rows and columns in the grid. By default, grids do not have gutters set up and require the developer to explicitly define the gutter, or gap, between rows and columns.

Note 💡: a gutter differs from the padding and margin of the grid element.

New CSS Properties

Now, let's dive into the new CSS properties that come with CSS Grid:

Grid Container

The below properties are specifically used to define the structure of a grid container.

display: grid

CSS Grid adds a new value to the display property, grid, which specifies the target element as a grid container. That allows for the usage of grid-template-columns, grid-template-rows, and gap to express the grid's structure.


display: grid;

grid-template-columns

The grid-template-columns property defines the number of explicit columns in the grid and their respective sizes based on a CSS unit of measurement.


<!-- same size for all columns -->

grid-template-columns: 1fr 1fr 1fr 1fr 1fr [cols...];


<!-- unique sizes for each column -->

grid-template-columns: 25px 75px 35px [cols...];

grid-template-rows

The grid-template-rows property is exactly like grid-template-columns except it defines the number of explicit rows.


<!-- same size for all rows -->

grid-template-rows: 1fr 1fr 1fr [rows...];


<!-- unique sizes for each row -->

grid-template-rows: 50px 100px 75px [rows...];

gap

The gap property defines the size of the space between columns and rows. Think of this as a "gutter" that sits between the columns and rows of a grid.


<!-- set a 10px row and column gap -->

gap: 10px;


<!-- set a 10px row gap and a 50px column gap -->

gap: 10px 50px;

Grid Elements

The below properties are specifically used to define the layout and positioning of child elements within a grid container.

grid-column

The grid-column property is used on child elements of a grid container to specify which column, or columns, an element should cover.


<!-- place the element in a single column -->

grid-column: 1;


<!-- layout starting at line 1 to line 3 -->

grid-column: 1 / 3;


<!-- layout  starting at line 1 and span across column 2 -->

grid-column: 1 / span 2;

grid-row

The grid-row property is the same as grid-column, except it specifies which row, or rows, an element should cover.


<!-- place  in the first row -->

grid-row: 1;


<!-- layout starting at line 1 to line 3 -->

grid-row: 1 / 3;


<!-- layout starting at line 1 and span across row 2 -->

grid-row: 1 / span 2;

'/' and 'span'

The / "forward slash" is used with the grid-column and grid-row CSS properties to specify the area of an element using a starting and ending grid line.


<!-- layout starting at line 1 to line 2 -->

grid-row: 1 / 2;

The span keyword is used with the / "forward slash" and can span an element across the column or row after the specified grid line.


<!-- layout starting at line 1 and span across row 2 -->

grid-row: 1 / span 2;

Connecting back to duda flex

Now, with our newfound knowledge of CSS Grid, let's deconstruct the grid created in the above video.

As we can see from the Grid Design panel, the grid structure had 3 columns ( grid-template-columns: 3 ), 2 rows ( grid-template-rows: 2 ), and a 30px gap ( gap: 30px ).

At the start, we only have one child element within the main Grid, Max Powers. Then, we add Celine and Amy by duplicating Max and dragging them to their respective areas. After we dropped each element, Duda calculated the placement within the Grid based on its left side. Here's a table showing the CSS values used for grid-column and grid-row .

grid-column grid-column (lines) grid-row grid-row (lines)
Max 1 1 / 2 1 1 / 2
Celine 2 2 / 3 1 1 / 2
Amy 3 3 / 4 1 1 / 2

Note 💡: grid-column: 1 is the same as grid-column: 1 / 2 , same goes for grid-row.

What's next?

Stay tuned for the next expert posts, diving into Flex's full design capabilities through practical walkthroughs and pro tips.


Did you find this article interesting?


Thanks for the feedback!
A computer screen with a graph on it and a purple background.
By Santi Clarke April 24, 2025
Learn how platform ecosystems drive revenue and why they are essential for the growth of SaaS businesses.
By Santi Clarke April 24, 2025
One of the greatest challenges for SaaS platforms is keeping users engaged long-term. The term “stickiness” refers to a product's ability to retain users and make them want to return. In the context of SaaS platforms, creating a sticky product means that users consistently find value, experience seamless interactions, and continue using the product over time. The following are 7 practical strategies you can take to improve the stickiness of your SaaS solution. 1. Offer websites that help customers build their digital presence One of the most effective ways to make your SaaS platform sticky is by offering websites to your users. Many businesses today need an online presence, and by providing a platform where your customers can easily build and manage their websites, you increase their reliance on your product. When you offer users a website-building solution, you’re helping them create something foundational to their business. Websites, in this case, aren’t just a tool—they become a part of their identity and brand. This deepens their engagement with your platform, as they need your product to maintain and update their site, ultimately making them less likely to churn. Plus, websites naturally encourage frequent updates, content creation, and customer interactions, which means your users will return to your platform regularly. When you can give your users the tools to create something so essential to their business, you make them more dependent on your platform. This creates a higher barrier to exit, as migrating a fully built website to another service is no small task. In fact, websites are some of the stickiest products you can sell, so adding them to your product portfolio can be one of the best decisions you can to keep your customers using your technology for the long haul. 2. Deliver continuous value through product innovation The key to keeping users coming back to your SaaS platform is ensuring that they consistently see value in it. This means not only meeting their immediate needs but also evolving to address their growing demands. Constant product innovation is essential for keeping your users satisfied and invested in your platform. One way to achieve this is through regular updates that add new features or improvements based on user feedback. A SaaS platform that evolves with its users will keep them engaged longer, making it harder for competitors to steal their attention. Encourage user feedback and prioritize updates that create tangible improvements. This creates an ongoing relationship with your users, which boosts stickiness. 3. Offer a multi-product solution Another powerful way to increase your platform’s stickiness is by offering a suite of products or features that integrate well together. When your users adopt multiple products, they are more likely to stay because they become embedded in your ecosystem. The benefits of this strategy are clear. Research shows that once users adopt more than one product, especially when they integrate >4 tools into their workflow, their likelihood of churn decreases significantly. This happens because the more a user integrates into your suite of products, the harder it is for them to switch to a competitor. These users have invested time in learning your ecosystem and rely on it for their day-to-day operations, making it much harder for them to make the switch. 4. Create a personal connection with your users Human connection is one of the most powerful drivers of user retention. People don’t want to feel like they’re using a cold, faceless platform. By offering exceptional customer support, personalized communication, and community engagement, you build a relationship with your users that goes beyond the product itself. Make sure your support team is responsive, knowledgeable, and empathetic. You can also consider offering tailored onboarding experiences to ensure users understand how to make the most of your platform. When users feel like their success matters to you, they are more likely to remain loyal. 5. Leverage data to personalize the user experience Using data to drive personalization is another strategy that can significantly increase the stickiness of your platform. By tracking user behavior and usage patterns, you can tailor the experience to each individual user’s needs. This could mean recommending features they haven’t yet explored or sending them reminders about tools they may not be fully utilizing. Personalization gives users the feeling that the platform was designed specifically for them, making it harder to walk away from. By demonstrating that you understand their unique needs, you can build a stronger connection and ultimately increase retention rates. 6. Focus on seamless integrations and API capabilities To further increase stickiness, consider expanding your product’s ability to integrate with other tools your users already rely on. Whether it’s email marketing software, CRM systems, or social media management tools, seamless integrations add tremendous value by making it easier for users to incorporate your platform into their existing workflows. The more your product can work in tandem with other popular tools, the more indispensable it becomes. In fact, users who depend on integrations are less likely to churn since their entire ecosystem is tied to your platform’s functionality. 7. Encourage user advocacy and community building User advocacy is another powerful tool in building a sticky product. When users feel a sense of community or even ownership over the platform, they become your most passionate promoters. Encourage your users to share their success stories, join community forums, or contribute to product development through beta testing or feedback loops. A thriving user community not only increases user engagement but also creates a sense of loyalty. When users are part of something larger than themselves, they are more likely to remain committed to your platform, reducing churn and increasing lifetime value. Create deep, lasting customer relationships Making your SaaS platform sticky is all about creating a deep, lasting connection with your users. This requires building a platform that continuously delivers value, creating a seamless and personalized experience, and integrating features that keep users coming back. By focusing on product innovation, offering a multi-product ecosystem, and fostering strong user relationships, you’ll be well on your way to reducing churn and boosting user retention. Stickiness isn’t just a nice-to-have; it’s essential for long-term success. Focus on creating a platform that users can’t imagine living without, and you’ll see them stick around for the long haul.
By Shawn Davis April 24, 2025
Your team is likely pretty familiar with the products they built, but what about the ones they didn’t? Integrated tools can throw a wrench into your support operations, but they don’t have to.
Show More

Latest posts